How to Upload a Wordpress Site to Github
At the beginning of the new year, I decided to drift my blog from Wordpress to Github Pages. Even though the process was pretty simple, cheers to a number of open-source tools, there were a couple of hurdles along the way, so I decided to create this footstep-by-stride guide.
Setting Up the project
GitHub Pages runs on summit of the GitHub platform and is powered by Jekyll, a templating engine that translates Markdown to static HTML.
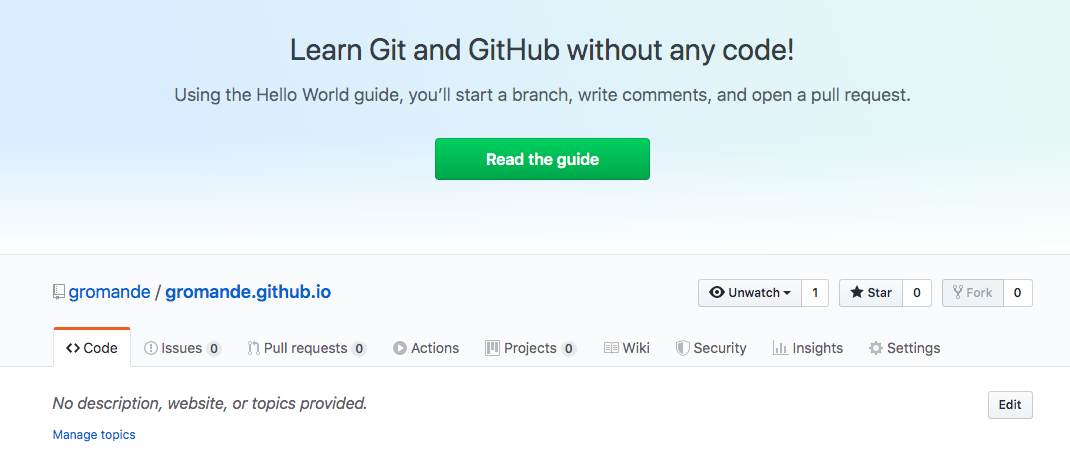
Kickoff past creating a GitHub repository named <username>.github.io where <username> is your GitHub username. In my case the repository is gromande.github.io:
Clone the repository to your computer:
git clone https://github.com/<username>/<username>.github.io.git Earlier creating the Jekyll site, you need to install Cherry along with the following gems:
- Bundler
- Jekyll (at the time of this post the latest version supported by GitHub pages was 3.viii.4. Bank check out the list of supported versions hither)
In one case Ruby is install on you calculator, run the following commands to install the gems:
precious stone install bundler gem install jekyll -v 3.8.5 You lot should now exist able to create your Jekyll site with Bundler:
bundle init parcel add together jekyll -v 3.8.5 --skip-install bundle exec jekyll new --strength --skip-parcel . Jekyll allows you to run your site locally, which comes in very handy if yous need to check how your posts await before making them public:
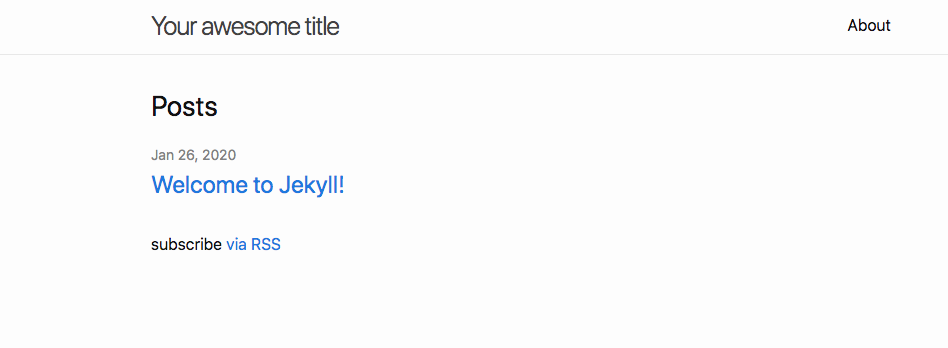
packet install packet exec jekyll serve Open your browser and go to http://localhost:4000 to see the default homepage:
Y'all tin customize the site's title, contact information, and social media links by updating the corresponding properties on the _config.yml YAML file:
title : Your awesome title email : your-electronic mail@case.com clarification : >- # this means to ignore newlines until "baseurl:" Write an awesome description for your new site hither. You can edit this line in _config.yml. It will appear in your document head meta (for Google search results) and in your feed.xml site description. baseurl : " " # the subpath of your site, e.g. /weblog url : " " # the base hostname & protocol for your site, e.thousand. http://example.com twitter_username : jekyllrb github_username : jekyll I likewise added the following property show an extract of my posts on the dwelling folio:
show_excerpts : true And changed the default postal service URLs to only include the title:
permalink : /:title/ Some of this configuration parameters are theme specific. Cheque out the default theme for a full list of available settings.
Now is besides a practiced fourth dimension to put your Markdown skills to test and add your bio to the about.md page.
Exporting Workdpress Posts
Fortunately, some people have gone down this path earlier and have created some useful tools to make the migration much easier.
For the virtually office, the steps beneath are described in this post in more than detail.
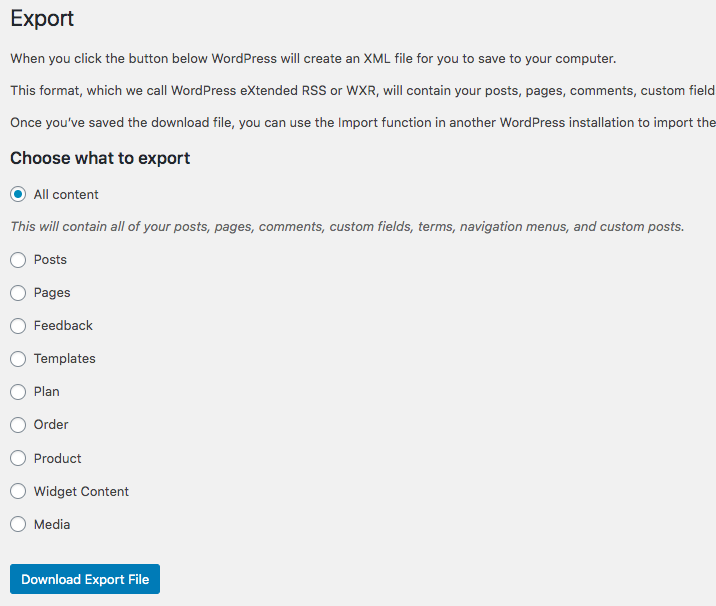
Log into you Wordpress admin panel and get to the following URL to export your Wordpress site:
https://your-domain/wp-admin/export.php
Select "All Content" and download the consign file to your computer:
The export file is in XML format and contains references to images and other assets. We can employ the jekyll-import Ruby jewel to convert the exported files into HTML and download all images to the assets directory.
Install the post-obit Gems:
gem install jekyll-import gem install hpricot gem install open_uri_redirections gem install reverse_markdown And run this command:
ruby -rubygems -due east 'require "jekyll-import"; JekyllImport::Importers::WordpressDotCom.run({ "source" => "<path-to-XML-export>", "no_fetch_images" => simulated, "assets_folder" => "assets/images" })' Lastly, utilize the following Ruby script to convert the HTML content to Markdown:
ruby ./wordpress-html-to-md.rb "_posts" All you have to do now is copy the entire assets folder to the root of your Jekyll project and move all the .medico files generate by the scrip from the _posts folder into the _posts folder of your Jekyll's site.
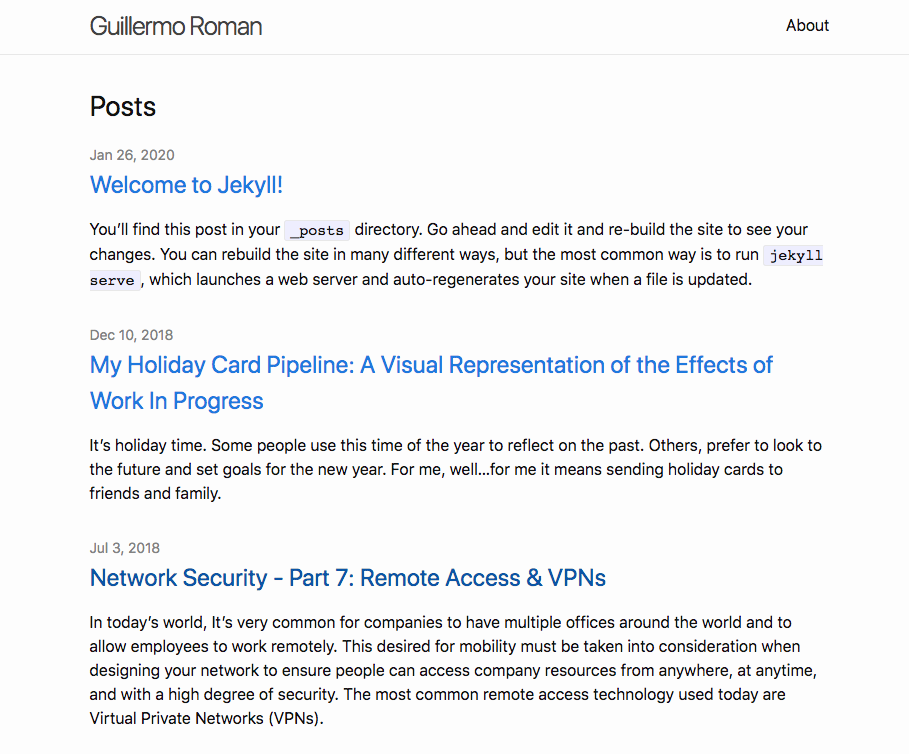
Re-run yous site locally and verify that all your posts are being listed on the home page:
Final Touches
From here, you can start customizing your site to your ain needs. In that location are plenty of resources online then I am not going to encompass customizations on this postal service. However, here are a couple of things you might desire to practise to "clean upwardly" your posts.
If y'all open ane of the Markdown files you'll see a bunch of metadata fields at the top of the page:
--- layout: post title: 'Network Security - Role 1: Setting Up Your Environment' date: 2017-12-16 22:50:19.000000000 -06:00 type: post parent_id: '0' published: truthful password: '' condition: publish categories: - InfoSec - Network Security tags: - pfsense - ubuntu - virtualbox meta: _edit_last: 'one' _oembed_26e7131f86c1664c79f1dc834e460dbc: "" _wpas_done_all: 'one' author: display_name: Guillermo Roman first_name: Guillermo last_name: Roman permalink: "/network-security-function-1-setting-up-your-environment/" --- The post-obit fields are not needed and tin be removed from all your posts:
- type
- parent_id
- published
- password
- condition
- meta
- author
In addition, some posts might incorporate accented URLs referencing other posts. Accented URLs are discouraged since they make your site less portable. Run the following sed command to supersede accented URLs with relative URLs. Replace <your-domain> with the domain for your site:
sed -i.bak 's/https:\/\/<your-domain>//g' *.md Source: https://guillermo-roman.com/migrating-wordpress-blog-to-github-pages/
0 Response to "How to Upload a Wordpress Site to Github"
Post a Comment